
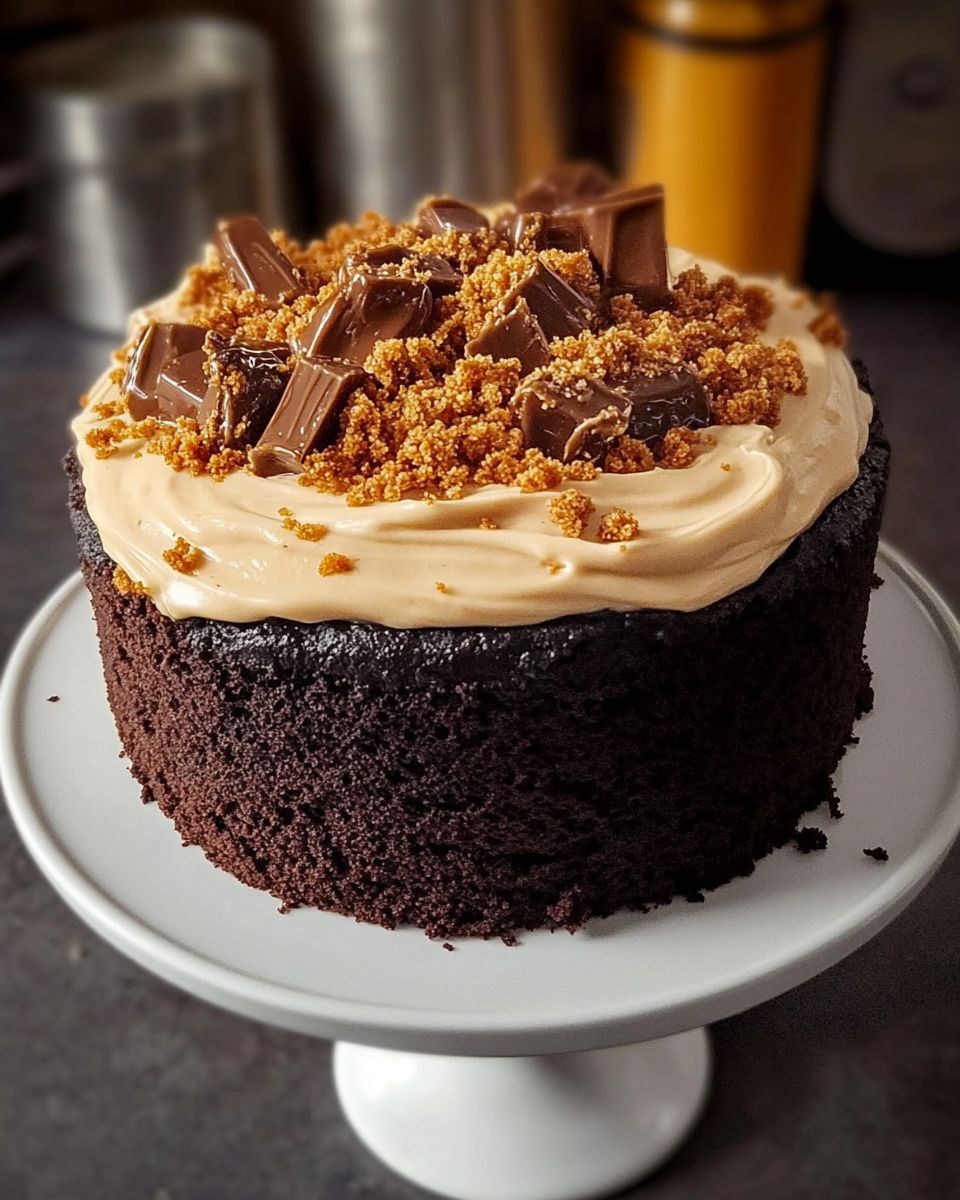
If you’re on the hunt for a showstopper dessert that tantalizes the taste buds, look no further than the irresistible allure of a Chocolate Butterfinger-Caramel Cake. Picture moist chocolate layers, decadent caramel drizzles, and the unmistakable crunch of Butterfinger candy that brings a playful texture to each bite. This cake isn’t just a treat; it’s an experience that combines rich flavors and a delightful combination of sweet and salty, making it perfect for celebrations or any day you want to indulge.
You can easily tweak recipe variations to suit your taste. How about adding a layer of peanut butter frosting, or swapping in a different candy bar for a fun spin? For the best results, remember to let your cake cool completely before frosting, and don’t shy away from homemade caramel to elevate the flavors. With these expert tips, your creation will not only look stunning but also taste utterly divine. So grab your baking essentials and let’s dive into the sweet world of Chocolate Butterfinger-Caramel Cake!
Ingredients for Chocolate Butterfinger-Caramel Cake:
For the Chocolate Cake:
- 1 ¾ cups all-purpose flour
- 1 ¾ cups granulated sugar
- ¾ cup unsweetened cocoa powder
- 1 ½ teaspoons baking soda
- 1 teaspoon baking powder
- ½ teaspoon salt
- 2 large eggs
- 1 cup whole milk
- ½ cup vegetable oil
- 2 teaspoons vanilla extract
- 1 cup boiling water
For the Caramel Sauce:
- 1 cup granulated sugar
- 6 tablespoons unsalted butter
- ½ cup heavy cream
- 1 teaspoon sea salt
For the Butterfinger Topping:
- 4 Butterfinger candy bars (2.1 oz each), crushed
- ½ cup additional Butterfinger pieces for garnish
- 1 cup whipped cream (for topping, optional)
Optional Ingredients for Variations:
- Substitute whole milk with buttermilk for a richer flavor.
- Add 1 cup of chocolate chips into the cake batter for an extra chocolatey bite.
- Replace unsweetened cocoa powder with dark cocoa powder for a more intense flavor.
- Incorporate 1 teaspoon of espresso powder into the cake batter to deepen the chocolate flavor.
- For a nutty twist, add ½ cup of chopped pecans or walnuts in the cake batter.
- Use lighter whipped topping instead of whipped cream if you’re looking for a lighter option.
Each of these ingredients plays a crucial role in creating the layers of rich chocolate goodness, sticky caramel sauce, and crispy Butterfinger crunch that make this decadent dessert so irresistible. Adjusting certain ingredients can tailor it to your personal taste—experimenting can result in unique and delightful variations!
How to prepare Chocolate Butterfinger-Caramel Cake:
Creating a Chocolate Butterfinger-Caramel Cake requires careful attention to detail. Follow these steps to achieve the perfect balance of chocolate, caramel, and Butterfinger goodness.
Prepare the Cake Layers
Begin by gathering your ingredients: 1 ¾ cups all-purpose flour, 1 ¾ cups sugar, ¾ cup unsweetened cocoa powder, 1 ½ tsp baking powder, 1 ½ tsp baking soda, and 1 tsp salt.
In a large mixing bowl, sift together the flour, sugar, cocoa powder, baking powder, baking soda, and salt. This ensures even distribution of the dry ingredients.
Next, add 2 large eggs, 1 cup whole milk, ½ cup vegetable oil, and 2 tsp vanilla extract to the dry mixture. Beat with an electric mixer on medium speed for 2 minutes until smooth.
Slowly incorporate 1 cup of boiling water into the batter. Mix on low speed until well blended. The batter will be thin, which is normal.
Preheat your oven to 350°F (175°C). Grease and flour two 9-inch round cake pans to prevent sticking.
Evenly pour the cake batter into the prepared pans. Bake for 30-35 minutes. Use a toothpick to test for doneness; it should come out clean.
Prepare the Caramel Sauce
While the cakes cool, prepare the caramel sauce. In a saucepan, combine 1 cup granulated sugar and ¼ cup water over medium heat.
Stir gently until the sugar dissolves and the mixture begins to bubble. Do not stir again. Cook until it turns a golden amber color.
Immediately remove from heat and carefully add ½ cup heavy cream, whisking until smooth. Set aside to cool.
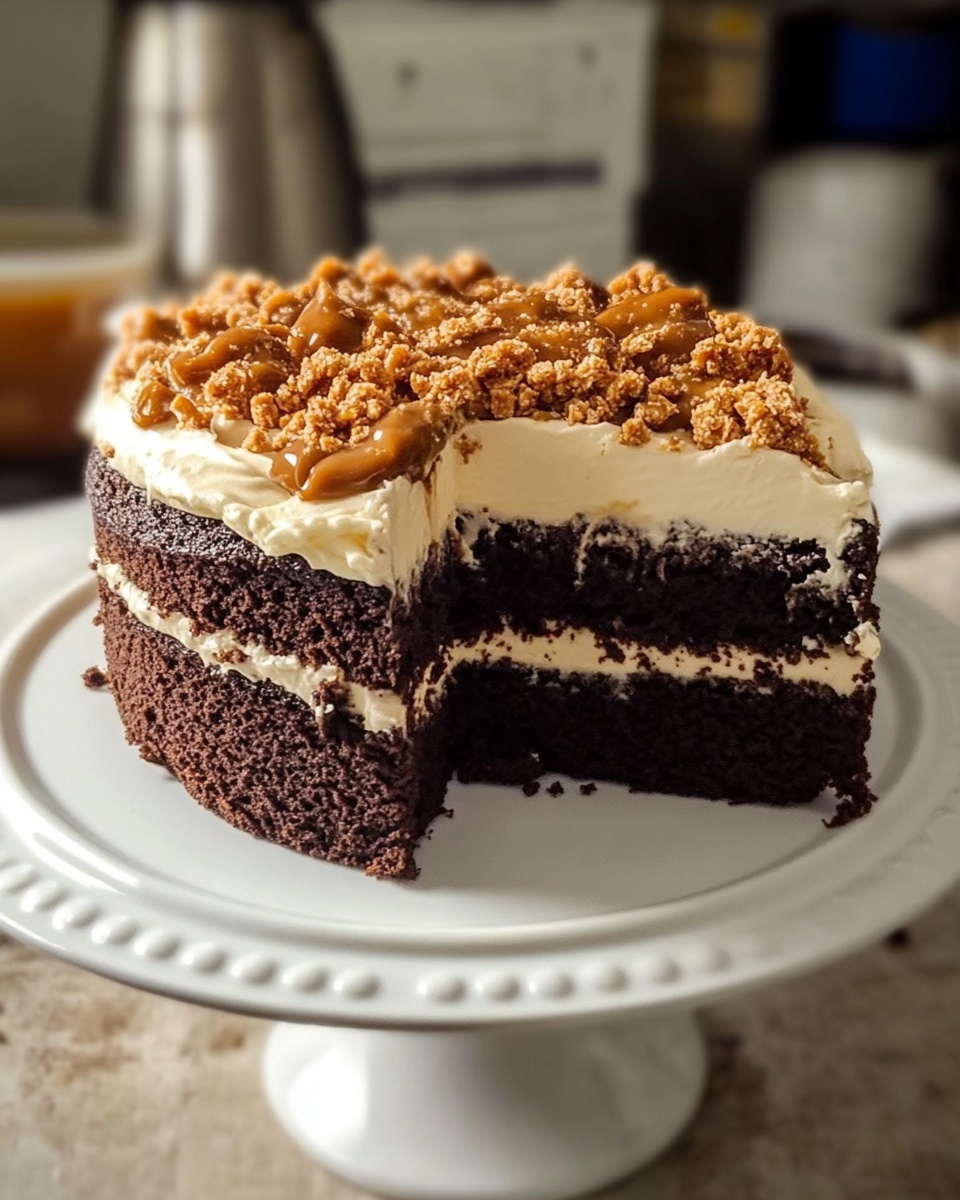
Assemble the Cake
Once the cakes are cool, remove them from the pans and place one layer on a serving plate. Drizzle a portion of the caramel sauce over the top.
Chop 1 cup of Butterfinger candy bars and sprinkle half of the pieces over the caramel.
Place the second layer on top, repeating the caramel and Butterfinger steps.
Finish with Frosting
For the frosting, beat together 1 cup unsalted butter, 4 cups powdered sugar, and ½ cup cocoa powder until creamy.
Spread the frosting over the top and sides of the cake. Garnish with remaining chopped Butterfinger pieces for added crunch.
Allow the cake to set before serving. Enjoy the delightful layers of Chocolate Butterfinger-Caramel Cake!
Tips for the Perfect Chocolate Butterfinger-Caramel Cake
Maintain the Right Temperature
Temperature plays a crucial role in baking. Make sure your ingredients, particularly butter and eggs, are at room temperature before you begin mixing. This ensures a smooth batter and better incorporation of ingredients. If you forget to take them out ahead of time, you can warm the eggs gently in a bowl of warm water for a few minutes. When baking, preheat your oven adequately. An oven thermometer helps confirm the correct temperature. Baking at the right temperature allows the cake to rise properly and develop the right texture.
Use Quality Ingredients
High-quality ingredients significantly enhance the flavor of your dessert. Select premium cocoa powder for richer chocolate flavor, and use real butter instead of margarine. If you are using chocolate for melting, opt for a good-quality chocolate bar instead of chocolate chips. The flavor difference will be noticeable. Fresh ingredients are vital too; check your baking powder and baking soda for freshness to ensure a good rise.
Smart Substitutions for Dietary Restrictions
If you need to accommodate dietary restrictions, you have options. To make a gluten-free version, substitute all-purpose flour with a 1:1 gluten-free flour blend. For a dairy-free cake, try unsweetened almond milk or coconut milk instead of regular milk, and replace butter with coconut oil or a plant-based butter substitute. For an egg-free version, use unsweetened applesauce or flaxseed meal mixed with water as a binding agent. About ¼ cup of applesauce or 1 tablespoon of flaxseed meal mixed with 2.5 tablespoons of water works well for each egg.
Enhance Your Chocolate Butterfinger-Caramel Cake with Variations
Variations can make your cake unique. Consider adding a pinch of sea salt to the caramel sauce for a delightful sweet-salty contrast. You can also incorporate chopped nuts like pecans or walnuts for crunch. For an added touch, try sprinkling some flaky sea salt on top of the finished cake, which adds to the visual appeal and flavor complexity. If you prefer a different candy, try replacing Butterfinger pieces with crushed Oreo cookies or Snickers for a different flavor profile.
Storage Tips for Chocolate Butterfinger-Caramel Cake:
To maintain the freshness and flavor of your delicious Chocolate Butterfinger-Caramel Cake, follow these straightforward storage tips. Proper storage ensures that each slice remains as delightful as the first.
Cool Completely Before Storing
Always cool your cake completely before you store it. If you place a warm cake in the fridge or cover it too soon, it might become soggy. Leave it at room temperature for at least an hour after baking.
Wrap Tightly for Freshness
Once your cake has cooled, wrap it tightly in plastic wrap. Ensure there are no air pockets, as exposure to air can dry out the cake quickly. For added protection, you can also wrap the cake in aluminum foil after the plastic wrap for double sealing.
Optimal Storage Conditions
Store the wrapped cake in a cool, dry place away from direct sunlight. If your kitchen is particularly warm, consider refrigeration to prevent spoilage. However, be aware that refrigeration might slightly alter the cake’s texture. For best results, keep it at room temperature for a few days.
Refrigeration Tips
If you know you won’t eat the cake within a few days, refrigerate it. Place the wrapped cake in an airtight container to protect it from other odors in the fridge. Use it within one week for the best taste.
Freezing for Long-Term Storage
For longer storage, freezing is an excellent option. Wrap the cake as instructed and place it in a freezer-safe container or bag. Ensure you remove as much air as possible to prevent freezer burn. You can freeze the cake for up to three months.
Thawing Guidelines
When you’re ready to enjoy your cake again, thaw it in the refrigerator overnight. This method preserves texture and moisture. Allow it to come to room temperature before serving for the best experience.
Following these simple storage tips helps keep your Chocolate Butterfinger-Caramel Cake delicious and enjoyable. By taking a few extra steps, you ensure that every bite remains a treat.
Related Recipes for Chocolate Butterfinger-Caramel Cake Lovers
If you adore the rich flavors of decadent cakes, you will enjoy these related recipes. Each one has a unique twist that complements or mirrors the flavors in the Chocolate Butterfinger-Caramel Cake, creating a delightful dessert experience.
1. Chocolate Caramel Poke Cake
This cake is all about the combination of chocolate and caramel, much like the Butterfinger cake. A holed chocolate cake is drenched in sweet caramel sauce, allowing for gooey goodness in every bite. This recipe is quick to prepare and guarantees a moist texture, making it a perfect alternative for those who love rich chocolate cakes.
2. Peanut Butter Cup Cheesecake
The Peanut Butter Cup Cheesecake offers a creamy and indulgent flavor profile similar to that of the Butterfinger cake. With a crumbly crust and a luscious peanut butter filling, this dessert highlights the fantastic pairing of chocolate and peanut butter. Both desserts satisfy your sweet tooth while showcasing everyone’s favorite flavor combinations.
3. Caramel Chocolate Tart
The Caramel Chocolate Tart brings the essence of both chocolate and caramel into a simple yet elegant dessert. The tart crust contains a rich chocolate filling topped with smooth caramel sauce. This recipe provides a sophisticated option for gatherings, while still keeping the same comforting flavors found in cake form.
These desserts share the delightful harmony of chocolate and caramel, ensuring they will appeal to anyone who enjoys the sweet and crunchy goodness of Butterfinger flavors. Each recipe offers a different texture and presentation but maintains the beloved combinations that you crave.
Frequently Asked Questions:
What are the key ingredients in a Butterfinger-Caramel Cake?
The essential components of a Butterfinger-Caramel Cake include rich chocolate cake layers, creamy caramel sauce, and crumbled Butterfinger candies. The chocolate cake provides a moist and decadent base, while the caramel adds a sweet depth of flavor. Topping it off with Butterfinger crumbles gives the cake its signature crunch and a delightful contrast in texture.
How long does it take to prepare the Chocolate Butterfinger-Caramel Cake?
Preparation time for this indulgent dessert varies, but on average, it takes around 30 to 45 minutes to mix the batter and bake the cake layers. Additionally, allowing time for the cakes to cool before frosting and assembling can take up to an hour. Overall, you should plan for approximately two hours from start to finish, including cooling and decorating.
Can I make this cake ahead of time?
Yes, you can absolutely prepare this fabulous treat in advance. The cake layers can be baked and frozen up to a month prior to serving. Just ensure they are well-wrapped. The caramel and butterfinger pieces can also be prepared ahead of time, making this cake a convenient choice for parties or celebrations.
What can I substitute for Butterfinger candy in the recipe?
If you want to switch things up, you can use other chocolate-covered candies like Reese’s or Snickers that can offer a similar taste profile. For a more homemade approach, consider mixing crushed graham crackers or toffee bits with melted chocolate to create a similar crunch and flavor without using Butterfinger specifically.
Is there a gluten-free version of this cake?
Yes, a gluten-free variation of the Chocolate Butterfinger-Caramel Cake can be made by using gluten-free all-purpose flour. Be sure to check that all other ingredients, especially any baking powder or baking soda, are gluten-free as well. This will allow those who are gluten-sensitive to enjoy the cake without worry.
How should I store the Butterfinger-Caramel Cake?
To keep the cake fresh and delicious, store it in an airtight container in the refrigerator. This helps preserve its moisture and flavor, and allows the caramel to meld beautifully with the chocolate layers. The cake is best enjoyed within a few days, but it can last up to a week if properly stored.
Conclusion:
The Chocolate Butterfinger-Caramel Cake is a delightful treat that showcases the perfect balance of rich chocolate, buttery caramel, and the nostalgic flavor of Butterfinger candy. This recipe is designed for simplicity, allowing you to impress guests with minimal effort. Flexibility is key; you can easily swap ingredients to suit your taste or dietary needs, such as using gluten-free flour or a different type of nut. Additionally, the customization options are endless—consider adding layers of whipped cream or experimenting with other candy toppings. Whether you’re preparing for a special occasion or simply craving a sweet indulgence, this cake adapts to fit any scenario. Embrace the joy of baking with this delightful dessert, and don’t hesitate to make it your own. Enjoy the deliciousness and ease that the Chocolate Butterfinger-Caramel Cake brings to your kitchen!
Print
Chocolate Butterfinger-Caramel Cake: A Decadent Delight
- Total Time: 55
Ingredients
– 1 cup boiling water or hot coffee
– 2 large eggs
– 1/2 cup vegetable oil
– 1 cup whole milk
– 1 1/2 cups granulated sugar
– 1 3/4 cups all-purpose flour
– 1 teaspoon salt
– 2 teaspoons vanilla extract
– 3/4 cup unsweetened cocoa powder
– 1 1/2 teaspoons baking powder
– 1 1/2 teaspoons baking soda
– 1 cup unsalted butter
– 2 cups packed light brown sugar
– 1/2 cup whole milk (for frosting)
– 4 cups powdered sugar, sifted
– 1 1/2 cups crushed Butterfinger candy bars
– 1 cup caramel sauce (store-bought or homemade)
– Extra caramel sauce for drizzling (optional)
Instructions
1. Preheat your oven to 350°F (175°C). Prepare two 9-inch round cake pans by greasing them with butter and dusting with flour, or lining them with parchment paper for easy removal.
2. In a large mixing bowl, add the flour, granulated sugar, cocoa powder, baking powder, baking soda, and salt. Sift these dry ingredients together to ensure there are no lumps and everything is well combined.
3. Next, add the eggs, milk, vegetable oil, and vanilla extract to the bowl of dry ingredients. Beat the mixture with an electric mixer on medium speed for about 2 minutes, until the batter is smooth and fully combined.
4. Carefully stir in the boiling water or hot coffee. The batter will be quite thin, but this will help create moist, tender cake layers.
5. Divide the batter evenly between the two prepared cake pans. Bake in your preheated oven for 30-35 minutes, checking for doneness with a toothpick inserted into the center—it should come out clean.
6. Once baked, let the cakes cool in their pans for around 10 minutes. Then, gently turn them out onto wire racks to cool completely before frosting.
7. While the cakes cool, prepare the caramel frosting. In a medium saucepan, melt the unsalted butter over medium heat. Stir in the brown sugar and cook while constantly stirring for about 2 minutes. Gradually add in the milk, bring it to a gentle boil, then remove from heat. Allow to cool slightly.
8. Whisk the powdered sugar into the butter mixture until the frosting is smooth and creamy. Finally, stir in the vanilla extract.
9. To assemble the cake, place one of the baked layers on your serving plate. Spread a generous layer of caramel sauce on top and sprinkle half of the crushed Butterfinger candy bars over the sauce.
10. Gently place the second layer of the cake on top and frost the entire cake with the caramel frosting. Top it off with the remaining crushed Butterfinger pieces.
11. If you like, drizzle extra caramel sauce on top for an even sweeter finish. Cut into slices, serve, and revel in every rich, gooey bite of this phenomenal dessert!
Nutritional Information: This cake is rich, offering a balance of sweetness and decadence with a combination of carbohydrates, fats, and protein. Each slice contains approximately 450 calories with key nutrients from the chocolate, butter, and the Butterfinger pieces.
- Prep Time: 20
- Cook Time: 35